Overview
This article covers how to create an assignment in Brightspace including settings.
Instructions
1. At the top of your course page, from the blue course navigation bar, click Content.
2. Navigate to the Unit or Lesson where you want your assignment to appear.
3. Click the gray Create New button at the top of the page.

4. Select Assignment from the next page.

5. From the New Assignment page, enter an Assignment Title for the assignment.
6. For Grade Out Of, enter the number of points for the assignment. Note: Do not enter a zero for an ungraded assignment; leave as ungraded.
7. Select whether the assignment will be in the Grade Book by clicking the drop-down menu.
- Edit or Link to Existing: Choose to either create and link to a new grade item, or link to an existing grade item.
- Not in Grade Book: Selecting this will prevent the assignment from being used for grading calculations. This is not a recommended setting.
- Reset to Ungraded: Will remove points and assignment from Grade Book.
8. Enter any applicable Instructions and/or a due date for the assignment.
9. Other available options include uploading a file from your computer, Google Drive, or OneDrive, adding a weblink, or recording/uploading video/audio files. The icons for these options are available directly below the instructions text box.

10. If you do not wish to configure your assignment further, toggle the assignment to Visible and click Save and Close.
Details on advanced settings are below.
Setting Availability Dates
To set a start date and end date
- From the New Assignment page, expand the Availability Dates & Conditions accordion.
- Set a Start Date and an End Date.
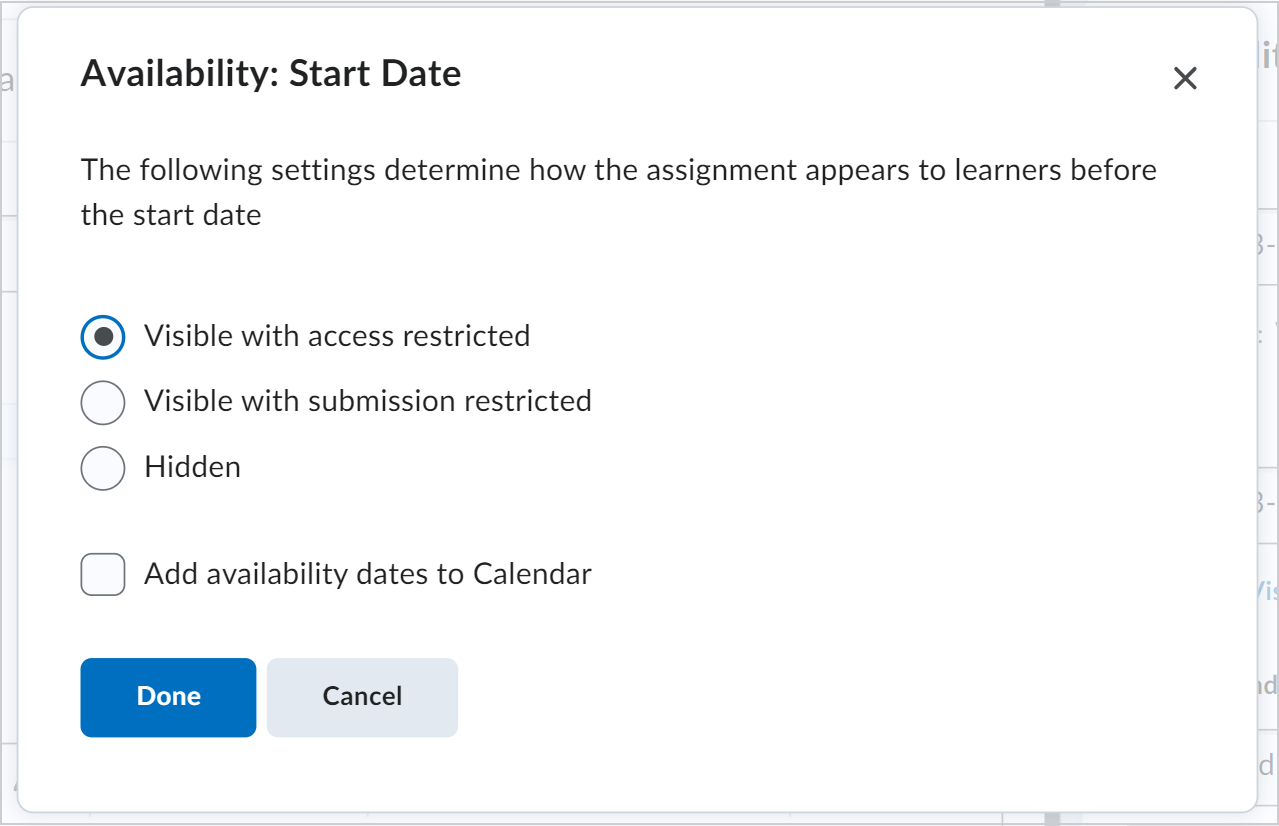
- Click the assignment availability field below the start and end date. In the Availability dialog, choose from the following for each date:
- Visible with access restricted: The assignment will be visible to learners before the Start Date or after the End Date, but they cannot click or open it. Learners can see the name, dates, and restrictions but cannot see the assignment description or attachments.
- Visible with submission restricted: The assignment will be visible to learners before the Start Date or after the End Date, and they can click or open it, but they cannot submit or mark it as complete. Learners can see all details about the assignment, including description, attachments, and rubrics, but they cannot upload files, enter comments, or mark the assignment as complete (for observed in person / on paper submission).
- Hidden: The assignment is hidden to learners until the start date is reached or after the end date passes. Learners cannot see the assignment anywhere, including corresponding Calendar events and Notifications.
- In the dialog, choose to select Add availability dates to Calendar if you want the start or end date available in your course calendar.
The new assignment is created with specified start and end dates.
Release Conditions
You can add release conditions to your assignment. Release conditions are conditions that must be met for an assignment to be made visible to learners. For example, you can set your assignment to only be available to learners when they achieve a specified score on a quiz.
To create a new release condition
- From the New Assignment page, expand the Availability Dates & Conditions accordion.
- Under Release Conditions, click Add Release Condition and select Create New.
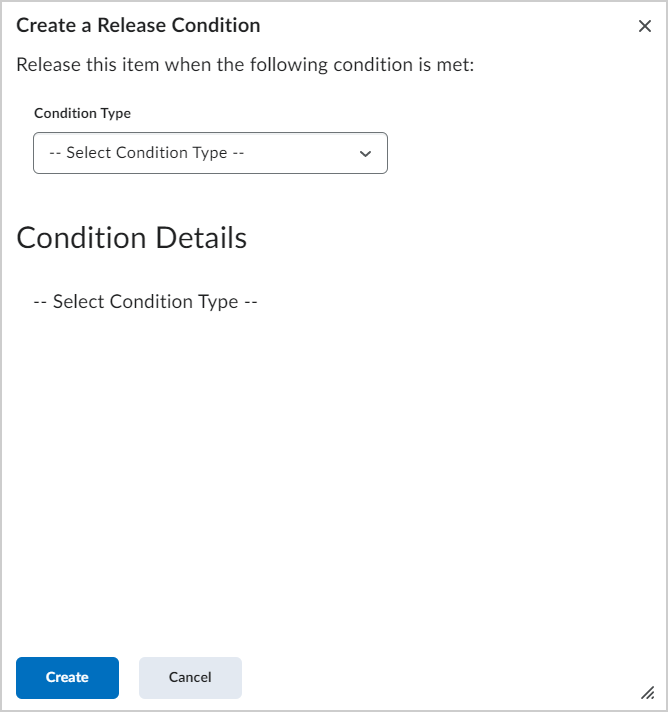
- Under Condition Type, select the condition that must be met.
- Under Assignment Submission Folder, select the assignment submission folder in which this condition must be met.
- Click Create.
- If you do not wish to configure your assignment further, toggle the assignment to Visible and click Save and Close.
A new release condition is added to your assignment. Release conditions can be reused in future assignments.
Manage Special Access
You can Manage Special Access for your assignment. Special access permissions allow you to set different availability dates and times for specific users. For example, you could add special access after an assignment’s end date has passed for users who have a legitimate excuse for missing the deadline. The special access icon displays on the Assignment list page beside any assignment that includes special access settings.
To make your assignment available to select users
- From the New Assignment page, expand the Availability Dates & Conditions accordion.
- Click Manage Special Access.

- Select one of the following options:
- Allow users with special access to submit outside the normal availability dates for this folder.
- Allow only users with special access to see this folder.
- To add users, click Add Users to Special Access.
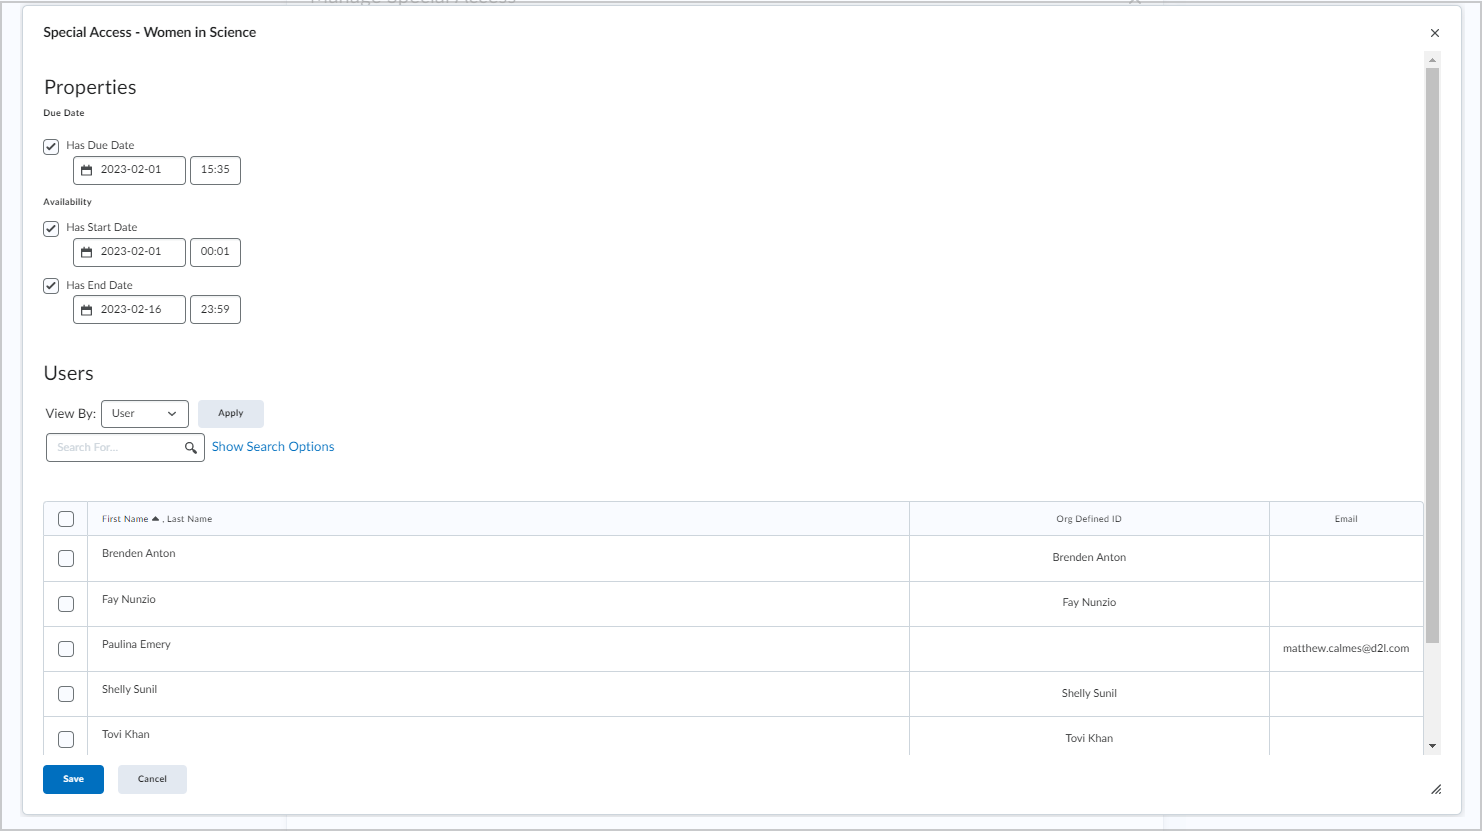
- To give users that have special access a different assignment due date, select the Has Due Date check box and set the due date for the assignment.
- Under Availability, select the Has Start Date and Has End Date check boxes and set the date availability for when you want users to have special access to the assignment.
- In the Users area, select the users you want to give special access to.
- Click Save and then click Save and Close.
- If you do not wish to configure your assignment further, toggle the assignment to Visible and click Save and Close.
Submission and Completion Settings
Individual and Group Assignments
You can choose whether your assignment is an individual assignment or a group assignment. Note: You must have groups set up in your course to set an assignment as a group assignment.
To choose your assignment type:
- From the New Assignment page, expand the Submission & Completion accordion.
- For the Assignment Type, select one of the following:
- Individual Assignment
- Group Assignment: From the Category drop-down menu, select an existing category to align your assignment to.
- If you do not wish to configure your assignment further, toggle the assignment to Visible and click Save and Close.
Configuring Assignment Submissions
You can choose what type of submission is required for your assignment, as well as allowable file extensions for that submission, how submissions are kept, and whether you receive a notification email when assignments are submitted.
- From the New Assignment page, expand the Submission & Completion accordion.
- Under Submission Type, select one of the following:
- File Submission: set the number of Files Allowed Per Submission
- Text or file Submission: set the number of Files Allowed Per Submission.
- Text-only submission
- On paper submissions: set Marked as completed to one of the available options:
- Manually by learners
- Automatically on evaluation
- Automatically on due date
- Observed in person: set Marked as completed to one of the available options:
- Manually by learners
- Automatically on evaluation
- Automatically on due date.
- Under Allowable File Extensions, select an option to restrict file extensions on submissions for the assignment.
- To receive email notifications when an assignment is submitted, under Notification Email, enter an email address or multiple email addresses separated by a comma. Note: Notification emails are only available for text-only or text or file submission types.
View the Creating Assignments Workshop on Mediasite for additional information and instructions.