To set a start date and end date
1. From the New Quiz page, expand the Availability Dates & Conditions accordion.
2. Set a Start Date and an End Date. Check the box next to Add Availability Dates to Calendar if desired.
To set release conditions
You can add release conditions to your quiz. Release conditions are conditions that must be met for a quiz to be made visible to learners. For example, you can set your quiz to only be available to learners when they have submitted an assignment.
1. From the New Quiz page, expand the Availability Dates & Conditions accordion.
2. Under Release Conditions, click Add Release Condition and select Create New.
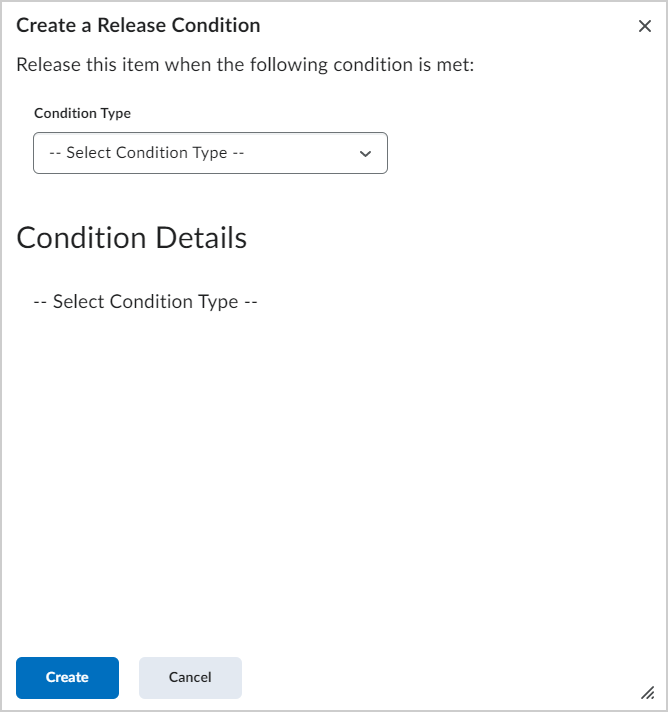
3. Under Condition Type, select the condition that must be met.
4. Under Condition Details, select the details with how this condition must be met.
5. Click Create.
6. If you do not wish to configure your Quiz further, toggle the quiz to Visible and click Save and Close.
A new release condition is added to your quiz. Release conditions can be reused in future quizzes.
To make your quiz available to select users
1. From the New Quiz page, expand the Availability Dates & Conditions accordion.
2. Click Manage Special Access.

3. Select one of the following options:
- Allow selected users special access to this quiz.
- Allow only users with special access to see this quiz.
4. To add users, click Add Users to Special Access.

5. To give users that have special access a different quiz due date, select the Has Due Date check box and set the due date for the quiz.
6. Under Availability, select the Has Start Date and Has End Date check boxes and set the date availability for when you want users to have special access to the quiz.
7. Under Timing, select if you wish to override the time limit associated with the quiz for this user.
8. Under Attempts, select if you wish to override the number of attempts associated with the quiz for this user.
- If the user has more than one attempt allowed, you can select if you only want the additional attempt(s) available based on score of the original attempt of the quiz. You may also select unlimited attempts.
9. In the Users area, select the users you want to give special access to.
10. Click Save and then click Save and Close.
11. If you do not wish to configure your quiz further, toggle the quiz to Visible and click Save and Close.
Additional Settings
You may enter a password if you wish to restrict access further.
Note: IP Restrictions is not a recommended setting.